


Last Half of Darkness : Shadows of the Servants WALKTHROUGH
Because this adventure is non-linear, this walkthrough follows only one of the many possible sequences of gameplay. You may want to try reading only the section you are stuck in. If possible, read only one line of text at a time to avoid revealing the next line and possibly a clue. Enjoy!
The summoning has begun. A bright flash of white light and you awake inside...
The Dark Room
You find yourself inside a dark room, carrying only a small piece of paper with strange markings on it. How did I get here? What does this paper mean and how did I get it. Was someone trying to help me? Perhaps the book on the table will provide some answers? After reading the book, you try opening the door, but it's locked. You move around the room and find another door. It's not locked and It's the way out!
- Exit room and enter Stairway
- Do not go to Mansion yet, but rather up street, into town. Move up street again, and into...
Voodoo Shop
The shop is filled with hundreds of items for sale, however, only the Cabinet seems to contain anything that might be of value to you. Potions, scrolls, elixirs, herbs... interesting, but what exactly do I need? Doesn't seem like stuff I should fool around with. Better check this out later. Move to the Board of Blood Stones on the left side of the shop (on the table, under the large cage). Click on the right side of the table to hear directions on how to play the blood stone game.
Swap two-conjoining stones to create a row of three or more. "The more stones in a row, the more blood will start to flow" Some stone-types provide more blood than others - Try to figure out which ones increase the most blood. Blood will gradually decrease in vial - so try not to take too long. Once the vial is full a vision will appear in the center of the board... A skull appears with two different colored eyes - purple right eye and a red left eye - "The secret lies within the eyes" What does that mean? Perhaps I will find out later?
- Exit shop, move down street and then enter the...
Alley with Strange Man at Table
He has a game for you. Are you up for the challenge? If you leave without winning, he will taunt you back with his cryptic poetic words...

"Choose correctly with your eyes...
Three times the key to see the prize...
look again inside the shop...
to find the fruit is in it's spot."

Step up to the table and watch carefully the cup with the ball - He will distract you for a second at the beginning. The game is different each time. If you win 3 times in a row, he will show you an item you will need. Go back into the Voodoo Shop and get this item from the Cabinet. (you will know later more about this item)
- Exit alley and move left...outside door. Open and enter door into...
New Orleans Novelty & Toy Company
It appears this business is no longer. Just a dirty sign leaning up against the wall and a final letter to it's employees (Examine note on wall next to sign) - Move through the dark arch-doorway and down the long corridor to the...
Fortune-Telling Machine
A few clicks on the button, reveals it must be broken. Perhaps this is the machine the note on the wall was referring to? Not sure...Can't find a model number. Maybe you can fix it? Better take a look inside.
- Click on machine door near bottom to open then enter...
Inside Machine
The ic-board contains 12 clock Mhz circuits with tiny numbers displayed next to each. The lower-right circuit displays an "ERR" flashing in its display window. The note on wall mentioned something about lightning changing the clock processor's speed (and there sure has been plenty of lightning tonight) so perhaps it just needs a few adjustments to get it working. But what could the correct settings be? The circuit pattern looks familar... It has the same arrangement as the piece of paper you're carrying doesn't it? Notice the roman numerals on the paper match the numeric numbers on the ic-board.
- Adjust the processor clocks according to the tiny numbers on the piece of paper found inside game package. Once adjusted correctly the "ERR" will change to the text "SET"
- Exit inside machine and press button again (Notice how now it's flashing)
- Click on the card-drop box in lower part of machine to read card - "You will get a HAND in opening a locked door" - Strange fortune - but ok, you can probably use all the hands you can get, right?
- Exit the corridor and the shop then move back through town until you reach the Town Entrance.(next to staircase where you came out of first room) Click the house on the hill in the distance to move to...
Mansion
Squeeze through the Front Gate to the Porch and then enter the mansion Foyer.
- Enter the left Hall and Examine the table. Take Mira's Journal. RIGHT-CLICK to view the book and turn the pages to reveal more clues written by Mira. (Most of it you won't understand now - but keep it handy for future reading) Move back and then enter the...
Study
The study contains only a dimly lit desklamp to provide light, making it difficult to examine things. First, you might want to check out the desk top. There is a torn piece of paper sitting on the large chart. Take it and RIGHT-CLICK on it to examine it closer. Put the pieces together by dragging each piece into the 4 guide marks located at each corner. (Again, it might not make sense now - but holds a clue for a future puzzle)
- Move "back" from the desk top.
- Click on the Desk Drawers to open them. Open the second drawer and take the light bulb. Open the third drawer for the magnifying glass and open the bottom drawer for the fuse.
- Examine the strange ornament on the top of the bookcase. It appears it could be a button. Press it to reveal a secret passage behind the large painting on the opposite side of room.
- Enter Passage
Passage
Move down stairway and into bottom section of passage. Examine the web spun in the top-left corner of the pipes. A closer look reveals a tiny eggsack woven into the web. Take the spider eggs. Then move through right arch-doorway to...
Closed Metal Door
A push strong push on the door and you know this ain't moving. There is a open metal box to the right. Click on it to examine closer.
Electronic Door Lock Panel
The front faceplate of this electronic panel has been removed or destroyed. The circuit board appears to be ok, with no cracks or damage to the components. Perhaps it's only a fuse that has blown? That would be an easy fix. But where's the junction box to this section of the house?
- Click on FAR RIGHT side of screen to move "back"
- Exit passage to study then exit into hall and move forward into...
Dining Room
Get ready... the ghost of Mira tends to appear in sequence with a flash of lightning from outside and then leaves just as mysteriously. Listen carefully and learn the story of why she brought you here. Feel free to click on the dialog choices at bottom of screen to hear more.
-When finished listening, move forward into the...
Kitchen
A careful look on the center cooking counter reveals a small sharp knife. Take it. Feel free to use the phone here if you want a freakish ear worm to appear from inside the phone. Why? Is it Jaja's spirit?
- Move Near Refrigerator and open it. Take the cheese from inside refrigerator
- Open the cupboard and take the spider-cide. (Judging from all the web in this house - you might need it)
- Enter dark doorway into...
Pantry
Completely shrouded in shadows, it is difficult to see much in here. It would be nice to turn on the light, but it's so dark you can't even find the switch. It's got to be around here somewhere. You can see the bulb in the center of the room, so you know there must be switch. Aren't light switches are usually near the doorway. Better feel around in the dark.
- Turn on light... Bam! I guess that bulb wasn't good, huh?
- Replace bulb with new one found in desk drawer in study.
- Turn on light again.
Thats better. You can see now.
- Take lighter on chair and mouse-trap on counter
- Exit pantry and move out of kitchen and back into dining room again. Exit through doors on left side of dining room onto balcony.
Backyard
Immediately outside of the dining room doorway, you will find yourself on the balcony. Move into the backyard and then move to the east yard. Move to side of house and then to the shed.
- Open shed doors. (A strong force, opens from inside, throwing the doors open violently)
- Take the sledge hammer
- Move back to east yard, then to backyard, and then to door. Open door and enter...
Storage room
This room is mostly empty, except for a few boxes and a couple of shelves. A doorway in the back of this room is all bricked and boarded up. Is there a room behind those bricks? Can you break it down?
- Notice the wrench on top of the barrel? Take it.
- Use the sledge hammer to break down the boards and bricks.
- Enter the doorway and enter the...
Generator Room
A lamp from the storage room casts dusty beams of light on an old antique generator in the corner of this room. On the left wall contains a power-junction box. Perhaps it will open? Try it.
- Open the junction box to reveal a very large spider crawling over the exact section you need access to. How are you going to get rid of it? - Use the spider-cide on the spider
- Place the fuse into the empty slot.
Now to get the old generator working...Click on it to take a closer look.
- The lever is stuck. Do you have something that could move it? Try the wrench you found.
- Exit storage room and return to house. Enter the study and then the passage.
- Go down through secret passage and to the...
Electronic Door Lock Panel (second visit -after turning power on)
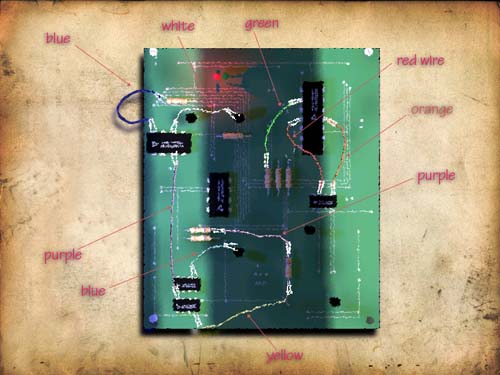
Now that you have turned on the generator and replaced the fuse you can notice the blinking red L.E.D. at the top of the circuit board. But since its red it must not be activated correctly. Normally the missing faceplate would provide the input to open the door. Better figure out a way to bypass. There are a few wires here. Can you figure out where they go? The wires seem to be very stiff and are not flexible at all. Perhaps if you line them up with possible circuits leads, you could figure out the only logical place they could fit?
- Using the mouse, drag all the wires onto the correct leads. Release the mouse button to place wire in spot. You will notice that the wires will click into place if you are near the correct area. Trial and error usually works here. However, there is a diagram on the last page of the Doctor's journal (located in basement furnace - of course getting down there is a completely different puzzle) - Click HERE to view the completed puzzle.
- Another hint for the wire puzzle is... don't bother trying to overlap any other "correctly placed" wires or circuitry. Everything fits very clean and neat when finished.
- When all wires are placed correctly you will hear a small buzz and the lab door will open.
- Enter doorway into...
Laboratory
Once inside the lab, move to the operating table and take the syringe then check out the computer. It might have some important information left by the doctor, huh? But of course she password protected it! That torn piece of paper you put together upstairs could have something to do with this.
- "Five touches of the keys" - a computer keyboard has keys, huh?
- "Electronic solution that you crave" - a computer is electronic huh?
- "Mirror image of the grave - why is the word grave underlined? Maybe it has something to do with the word "grave"
Figure it out yet? Nope?
- Type the word grave backwards into the computer. ( Type slowly: E V A R G )
- Take a look at the INFO folder and the UNTITLED folder. (The other folders contain documents that you probably won't understand)
- You might want to write down what you find in the two folders - You will need it later.
There's another doorway to the left you're probably eager to check out, but it's better to exit the lab and go back into house for now. Move through
the passage, to the study, back through the hall and into the foyer and then...
Upstairs
In the upstairs hall you are presented with 5 doorways and the remaining hallway further forward into the darkness. Check out the first door on the left. Your senses are quickly overwhelmed with the vision of a old dead woman in a wheelchair. Who? You will quickly learn that this house holds far more questions than answers. As the vision fades, you find yourself standing in...
The Doctor's Bedroom
Move closer to the dresser with mirror and open the bottom drawer to find a small box of ashes. Take the box. Again you are overwhelmed with a vision from the past. Who is the little boy? Is he part of this darkness? Or was he too, summoned to help?
- Don't bother examining the box of ashes. It contains no latch or door. There is no obvious way to open it.
- Exit the room back into the hall and go downstairs to the...
Foyer
An eerie strange moan is heard from upstairs as you make your decent from the staircase. A small doll appears from the darkness and floats down the stairway, onto the floor before your feet. Is this a gift? Should you touch it? Yes! Take the doll and move right, into the...
Music Room
From this distance, its hard to see, but it appears the piano bench could open. Try it. Yes! Take the sheet of music and use it on the piano to play the tune written by Mira. A ghost appears at the piano and then warns you never to play that tune. Apparently it stirs the darkness. She disappears and asks you to meet her upstairs - but wait until later. For now, examine the chess board.
- Notice the compartment used to store the playing pieces?
- Open the compartment and read the poem, glued to the drawer bottom.
- If you don't have a good memory you might want to write that down.
Stop examining chess board and enter the...
Green Room
This room is filled with plants, trees and a broken fountain. There is one particular plant that looks rather dry. Its soil is hard and needs watering badly. Perhaps you could find something to water it with?
As you leave the green room... A creature, hiding in the shadows, quickly runs towards you. You drop the doll in your haste but manage to escape.
Exit the green room and go back into the music room, then turn right into the doorway leading into the parlor, where the faint sound of a phone ringing can be heard in the distance. Move into the study and and answer the phone. (NOTE: if you were closer to the kitchen you can answer it there too)
"Ashes to Ashes... Dust to Dust!" - The box of ashes? How does he know I have it? Who is he?
"You cant open it!" - Talk about discouraging....
Hangup the phone, exit the study, enter the dining room, move into the backyard and then to the east yard. Go up steps to the back door and into the...
Room of Cages
This entire room is filled with cages. You notice a few open and examine one in particular, in the middle shelf to the right. A closer look reveals a tiny hair in the bottom of the cage. Perhaps you could use this, like the file on the computer in the lab stated? Better not contaminate it though.
- Leave the hair for now. (until you can find something sterile to put it in)
- Move left and check out the other row of cages on shelves. Is that a shovel underneath the left shelf? Take it.
- Exit cage room and back to east yard. Then move left into...
Grave Yard
Though, there are many graves surrounding this estate, you can feel a sense of overwhelming darkness on one grave in particular. Perhaps this grave should be dug up?
- Use the shovel to dig up the grave in front of you. (the grave covered in ivy, right of the statue)
- Enter grave and take the ring.
- RIGHT-CLICK on ring to examine it closer. Interesting! It moves when the symbols are clicked on.
- Get out of grave and move through cemetery gates to...
Outside Crypt
You're probably going to want to check out the crypt. But it's too dark to go in there without any light, so keep moving right, towards... swamp. With only a few fireflies to guide your way, find the path that leads to the...
Swamp House
Enter the house and talk with the lady in the rocking chair. She will tell you what she knows of this dark story and the doctor. Perhaps she could help you? Maybe she could give you a suggestion on how to open that box.
- Give box of ashes to the lady. Then listen to her suggestion. Does it make sense?
- Take a look at the book on the right side of room. Something about the "Heart of Darkness"
As you read the book, you begin to wonder if you could have Heart already. Remember that apple from the shop? You wonder if... no! It couldn't! Could it? You must see....
- Cut open apple with knife and examine to find the bloody beating heart of a crow, as mentioned in the book. It would appear this piece of the puzzle has been done for you. Is someone helping you?
- Return to...
Parlor
Place the box of ashes into the fireplace. The pressure inside has nowhere to go. A quick explosion and ashes are everywhere! A shiny object can also be found. Take the key. Apparently the doctor swallowed it before she died. I guess she really wanted to keep something locked. Go back upstairs and enter the first doorway on the right, into the...
Attic
Use the key you just found on the old chest. There's something inside. A staff of sorts. Take it and examine it. It looks familiar doesn't it. Remember Mira's journal you took from the hallway table earlier? The second page contained some symbols that look like the ones on the staff. You wonder if... yes... sections of the staff rotate.
- Click on the sections to align the staff combination according to Mira's notes in the journal.
- Leave the attic and return to the upstairs hallway.
- Enter the second door on the right, into the...
Bedroom
A closer look at the chair reveals something possibly sitting in it. Was that there earlier? Upon entering this dark room you can hear the faint whisper...
"Come Closer..." - a voice whispers
- Examine the chair. You have found the doll once again, however, now it is broken.
"I can hardly contain the secret inside of me." - the doll whispers
Secret inside the doll? More roaches? Examine the doll closely. Take the key.
There's another secret in this room. Perhaps it's underneath that dusty rug in the center of the room? Move the rug and enter...
Secret Room Beneath Floor
With only the light from the bedroom above this room is extremely dark, making it difficult to see much of anything. You can hear the faint sounds of a rodent near. Perhaps you catch it? But how? Where is it?
- Examine the hole in the wall, near the left side of room, to find a few rat droppings on the floor.
- Place the cheese on the mousetrap first, then place the mousetrap near the hole on the left side of room.
- You're going to have to come back later....but wait, before you leave...
...there's a partially hidden painting behind the container. Take the painting and examine it. While examining it, click on the painting to turn it around. It looks like there might be something written in the lower left corner. It's too small to read. Perhaps you have something you view it larger?
- Use the magnifying glass to see the writing, written in blood.
- Go back up the ladder into bedroom again. Exit bedroom into upstairs hallway and then move forward into...
North Hall
An interesting picture to the left reveals a scary surprise occasionally, but nothing of any real importance to your quest. If you move right, into the east hall, you will appear before a door. The voice of Mira's warns "you never to go into that room" but if you try, you will be influence with an eerie vision from the past. If you are persistent in trying to open the door, you will be greeted by Mira's sister, who, once again, tells you to never go into that room. So its probably safe to assume you should move left into...
|
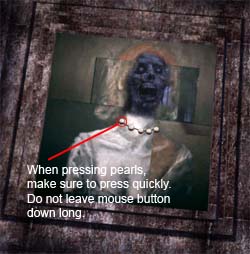
West Hall There is a rather creepy portrait of a hideous woman here. Click on it to take a closer look. She's wearing a pearl necklace. A closer look reveals the pearls are actually buttons. This scenario sounds a little like the poem you found downstairs in the chess drawer compartment. Do you remember what it said? - Press the buttons in sequence like the poem suggests. - Press pearl # 3 5 2 4 1 |
|
|
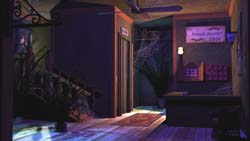
Le French Quarter Inn You wakeup to find yourself in a dimly lit hotel lobby. Move upstairs, bypassing the first floor (unless you feel like exploring it), and up to the second floor hall. Enter the last door on the right and into... |
|